Part 2.1 of RabbitMQ for beginners explains how to get started with RabbitMQ and Ruby.
This tutorial follow the scenario from previous article where a web application allows users to upload some user information. The web site will handle the information, generate a PDF and email it back to the user. Generating the PDF and sending the email will in this example case take several seconds. If you are not familiar with RabbitMQ and message queuing, I would recommend you to read RabbitMQ for beginners - what is RabbitMQ? before starting with this guide.

A youtube video describing the setup, Getting Started with RabbitMQ and CloudAMQP: Ruby & bunny, can be found on the bottom of this page.
Getting started with RabbitMQ and Ruby
Start by downloading the client-library for Ruby. Ruby developers have a number of options for AMQP client libraries. In this example, Bunny is used, an asynchronous client for publishing and consuming of messages.
You need a RabbitMQ instance to get started. A free RabbitMQ instance can be set up for testing in CloudAMQP, read about how to set up an instance here.
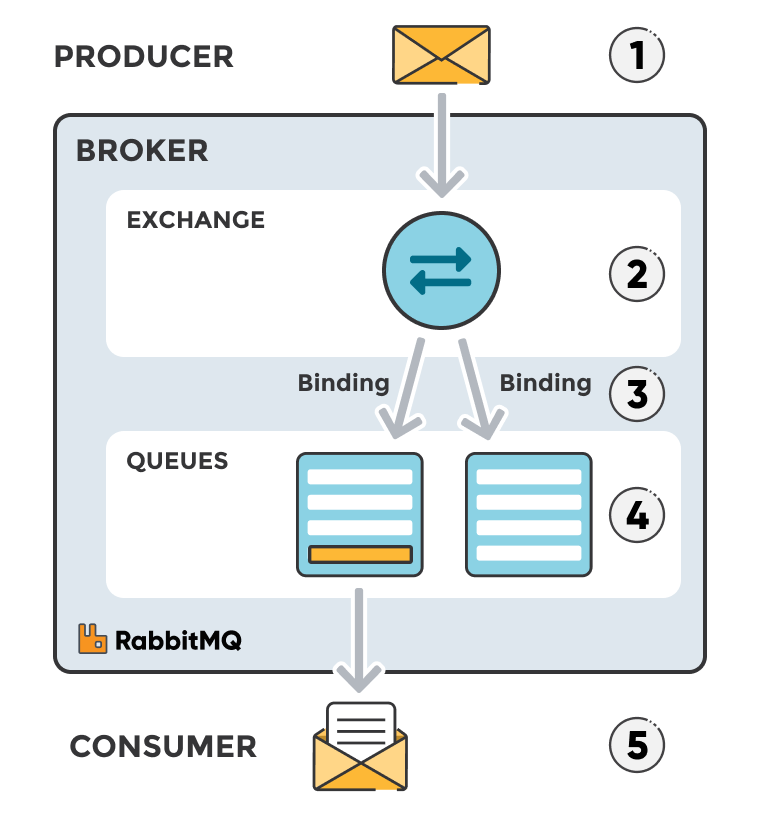
When running the full example_publisher.rb code below, a connection is established between the RabbiMQ instance and your application. Queues and exchanges are declared and created if they do not already exist and finally, a message is published.
The example_consumer.rb code sets up a connection and subscribes to a queue. The messages are handled one by one and sent to the PDF processing method.
The full code for the publisher and the consumer is first given, after that the code will be divided into blocks and explained per code block.

Full code
# example_publisher.rb
require "rubygems"
require "bunny"
require "json"

# Returns a connection instance
conn = Bunny.new ENV['CLOUDAMQP_URL']
# The connection is established when start is called
conn.start

# create a channel in the TCP connection
ch = conn.create_channel

# Declare a queue with a given name, examplequeue. In this example is a durable shared queue used.
q  = ch.queue("examplequeue", :durable => true)

# Bind a queue to an exchange
x = ch.direct("example.exchange", :durable => true)
q.bind(x, :routing_key => "process")

# Publish a message
information_message = "{\"email\": \"example@mail.com\",\"name\": \"name\",\"size\": \"size\"}"

x.publish(information_message,
  :timestamp      => Time.now.to_i,
  :routing_key    => "process"
)

sleep 1.0
conn.close
# example_consumer.rb
require "rubygems"
require "bunny"
require "json"
# Returns a connection instance
conn = Bunny.new ENV['CLOUDAMQP_URL']
# The connection is established when start is called
conn.start
# Create a channel in the TCP connection
ch = conn.create_channel
# Declare a queue with a given name, examplequeue. In this example is a durable shared queue used.
q = ch.queue("examplequeue", :durable => true)
# Method for the PDF processing
def pdf_processing(json_information_message)
puts "Handling pdf processing for "
puts json_information_message['email']
sleep 5.0
puts "pdf processing done"
end
# Set up the consumer to subscribe from the queue
q.subscribe(:block => true) do |delivery_info, properties, payload|
json_information_message = JSON.parse(payload)
pdf_processing(json_information_message)
endTutorial source code - Publisher
Set up a connection
# example_consumer.rb
require "rubygems"
require "bunny"
require "json"

# Returns a connection instance
conn = Bunny.new ENV['CLOUDAMQP_URL']

# The connection is established when start is called
conn.start
Bunny.new
returns a connection instance. Use the CLOUDAMQP_URL as connection
URL, it can be found in the details page for your CloudAMQP instance.
The CLOUDAMQP_URL is a string including data for the instance,
such as username, password, hostname and vhost.
The connection is established when start is called
conn.start
Create a channel
# reate a channel in the TCP connection
ch = conn.create_channel
A channel needs to be created in the TCP connection. A channel is a virtual connection inside a connection and it is used to send AMQP commands to the broker. When you are publishing or consuming messages or subscribing to a queue is it all done over a channel.
Declare a queue
# Declare a queue with a given name
q  = ch.queue("examplequeue", :durable => true)
ch.queue
is used to declare a queue with a particular name, in this case, the queue is called
examplequeue.
The queue in this example is marked as durable, meaning that RabbitMQ
never loses our queue.
Bind the queue to an exchange
# For messages to be routed to queues, queues need to be bound to exchanges.
x = ch.direct("example.exchange", :durable => true)

# Bind a queue to an exchange
q.bind(x, :routing_key => "process")
A direct exchange will be used, a direct exchange delivers messages to queues based on a message routing key. Routing key "process" is used. The exchange is first created and then bound to the queue.
Publish a message
  information_message = "{\"email\": \"example@mail.com\",\"name\": \"name\",\"size\": \"size\"}"

  x.publish(information_message,
    :timestamp      => Time.now.to_i,
    :routing_key    => "process"
  )
information_message
is all the information that will be sent to the exchange.
The direct exchanges use the message routing key for routing,
meaning the message producers need to specify the routing key
in the message.
Close the connection
sleep 1.0
conn.close
conn.close
automatically close all channels of the connection.
Tutorial source code - Consumer
Sample code for pdf processing
# Method for the pdf processing
def pdf_processing(json_information_message)
  puts "Handling pdf processing for:
  puts json_information_message['email']
  sleep 5.0
  puts "pdf processing done"
end
The method
pdf_processing
is a "todo" method that sleeps for 5 seconds to simulate the pdf processing.
Set up the consumer
# Set up the consumer to subscribe from the queue
q.subscribe(:block => true) do |delivery_info, properties, payload|
  json_information_message = JSON.parse(payload)
  pdf_processing(json_information_message)
end
subscribe
takes a block and processes it. It will be called every time a message arrives.
More information about Ruby and CloudAMQP can be found here.
You Tube Video: Getting Started with RabbitMQ and CloudAMQP: Ruby & bunny
Please email us at contact@cloudamqp.com if you have any suggestions or feedback.
