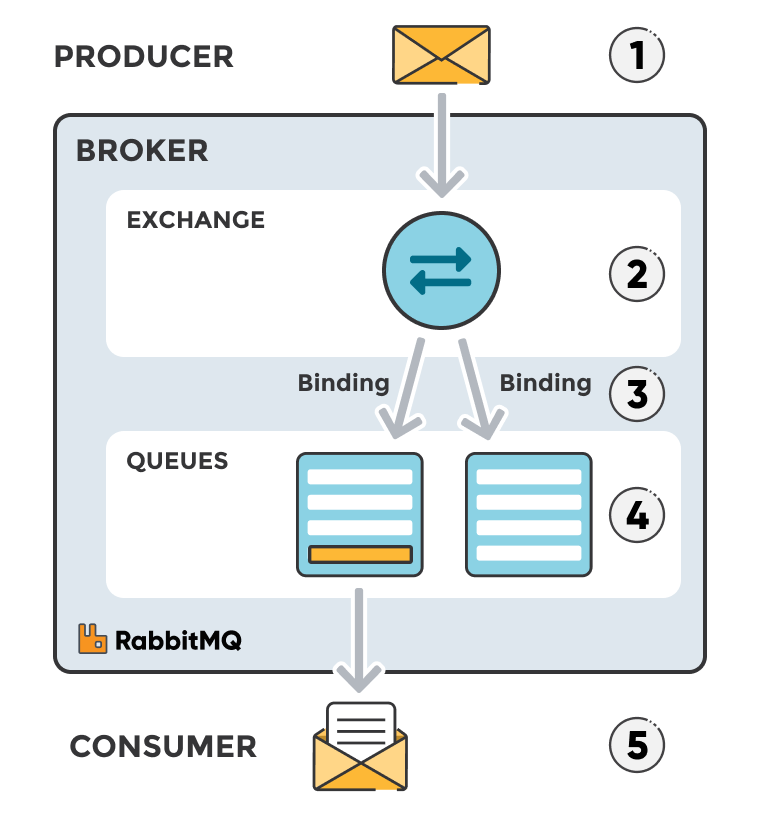
Part 2.3 of RabbitMQ for beginners explains how to get started with RabbitMQ and Python.
This tutorial follow the scenario used in the previous article, Part 1: RabbitMQ for beginners - What is RabbitMQ? where a web application allows users to enter user information into a web site. The web site will handle the information and generate a PDF and email it back to the user. Generating the PDF and sending the email will in this scenario take several seconds. If you are not familiar with RabbitMQ and message queuing, I would recommend you to read RabbitMQ for beginners - what is RabbitMQ? before starting with this guide.

Getting started with RabbitMQ and Python
Start by downloading the client-library for Python3. The recommended library for
Python is
Pika.
Put
pika==1.1.0
in your
requirement.txt
file.
You need a RabbitMQ instance to get started. Read about how to set up an instance here.
When running the full code given, a connection will be established between the RabbiMQ instance and your application. Queues and exchanges will be declared and created if they do not already exist and finally a message will be published. The consumer subscribes to the queue, and the messages are handled one by one and sent to the PDF processing method.
A default exchange, identify by the empty string ("") will be used. The default exchange means that messages are routed to the queue with the name specified by routing_key, if it exists. (The default exchange is a direct exchange with no name)

Full code
# example_publisher.py
import pika, os, logging
logging.basicConfig()

# Parse CLODUAMQP_URL (fallback to localhost)
url = os.environ.get('CLOUDAMQP_URL', 'amqp://guest:guest@localhost/%2f')
params = pika.URLParameters(url)
params.socket_timeout = 5

connection = pika.BlockingConnection(params) # Connect to CloudAMQP
channel = connection.channel() # start a channel
channel.queue_declare(queue='pdfprocess') # Declare a queue
# send a message

channel.basic_publish(exchange='', routing_key='pdfprocess', body='User information')
print ("[x] Message sent to consumer")
connection.close()
# example_consumer.py
import pika, os, time

def pdf_process_function(msg):
  print(" PDF processing")
  print(" [x] Received " + str(msg))

  time.sleep(5) # delays for 5 seconds
  print(" PDF processing finished");
  return;

# Access the CLODUAMQP_URL environment variable and parse it (fallback to localhost)
url = os.environ.get('CLOUDAMQP_URL', 'amqp://guest:guest@localhost:5672/%2f')
params = pika.URLParameters(url)
connection = pika.BlockingConnection(params)
channel = connection.channel() # start a channel
channel.queue_declare(queue='pdfprocess') # Declare a queue

# create a function which is called on incoming messages
def callback(ch, method, properties, body):
  pdf_process_function(body)

# set up subscription on the queue
channel.basic_consume('pdfprocess',
  callback,
  auto_ack=True)

# start consuming (blocks)
channel.start_consuming()
connection.close()
Tutorial source code - Publisher
# example_consumer.py
import pika, os, logging

# Parse CLODUAMQP_URL (fallback to localhost)
url = os.environ.get('CLOUDAMQP_URL', 'amqp://guest:guest@localhost/%2f')
params = pika.URLParameters(url)
params.socket_timeout = 5
Load client library and set up configuration parameters.
The DEFAULT_SOCKET_TIMEOUT is set to 0.25s, we would recommend to raise this
parameter to about 5s to avoid connection timeout,
params.socket_timeout = 5
Other connection parameter options for Pika can be found here:
Connection Parameters.
Set up a connection
connection = pika.BlockingConnection(params) # Connect to CloudAMQP
pika.BlockingConnection
establishes a connection with the RabbitMQ server.
Start a channel
channel = connection.channel()
connection.channel
create a channel in the TCP connection.
Declare a queue
channel.queue_declare(queue='pdfprocess') # Declare a queue
channel.queue_declare
creates a queue to which the message will be delivered. The queue will be given
the name
pdfprocess.
Publish a message
channel.basic_publish(exchange='', routing_key='pdfprocess', body='User information')
print("[x] Message sent to consumer")
channel.basic_publish
publish the message to the channel with the given exchange, routing key and body.
A default exchange, identify by the empty string ("") will be used. The default exchange
means that messages are routed to the queue with the name specified by routing_key,
if it exists. (The default exchange is a direct exchange with no name).
Close the connection
connection.close()The connection will be closed after the message has been published.
Consumer
Worker function
def pdf_process_function(msg):
  print(" PDF processing")
  print(" [x] Received " + str(msg))

  time.sleep(5) # delays for 5 seconds
  print(" PDF processing finished");
  return;
pdf_process_function
is a todo-function. It will sleep for
5 seconds to simulate the PDF-creation.
Function called for incoming messages
# create a function which is called on incoming messages
def callback(ch, method, properties, body):
  pdf_process_function(body)
The
callback
function will be called on every message received from the queue.
The function will call a function that simulate the
PDF-processing.
#set up subscription on the queue
channel.basic_consume('pdfprocess',
  callback,
  auto_ack=True)
basic_consume
binds messages to the consumer callback function.
channel.start_consuming() # start consuming (blocks)
connection.close()
start_consuming
starts to consume messages from the queue.
More information about Python and CloudAMQP can be found here. You can find information about Python Celery here.
Please email us at contact@cloudamqp.com if you have any suggestions or feedback.
